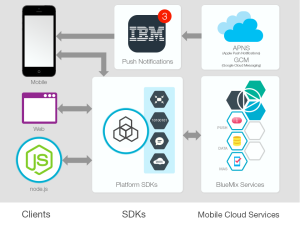
This post gives the key steps to get going in building a Mobile Cloud application on IBM’s Bluemix. This post focuses on using the Android Platform for building the application. IBM Bluemix’es mobile cloud application includes under its hood mobile services like mobile application security, push and mobile data. A Node.js is also thrown in to provide server-side functions.
The Bluemix Mobile architecture is shown below
As in the previous post an existing Mobile cloud application IBM’s bluelist -base is cloned to get familiarity with the steps involved. The IBM’s bluelist-base app enables the user to maintain a grocery list that persists as mobile data in the cloud instance. To get started perform the following
1) Install ADT + Eclipse bundle from the aforementioned link
2) Unzip and install Eclipse and the ADT bundle
3) Make sure you have the Java JDK for Eclipse. If not install from the following site Java SE Development Kit 8 Downloads
4) Since we will be cloning an existing application and using Eclipse to make the changes we need to install EGit.
5) To do this open Eclipse and select Help-> Install New Software and type in http://download.eclipse.org/egit/updates in the Work with text field and hit enter. You should see the following
6) Once EGit is installed the IBM’s bluelist-base App can be cloned as follows
7) In Eclipse click File->Import->Git->Import from Git and click Next
8) Choose Clone URI and Click Next
9) Enter the URI for IBM’s bluelist-base. This shown below
10) This will download all the necessary source files and other Android related files and directories into the workspace.
11) After this perform the Steps 2 to Step 6 from the link given Build an Android app using the MobileData cloud service
12) After you make the necessary code changes you are good to go
13) Make sure you right-click and add all the necessary imports required (also Ctrl+Shift + O)
14) Build the Project and make sure that there are no errors
15) You are now ready to run the mobile cloud application. We need to run the mobile app on a Virtual simulator. This can be done as
a) In Eclipse click Window->Android Virtual Device Manager. Click the Device Definitions tab.
b) Choose Nexus 7 (Google) and Click Create AVD.
c) This will open a New Window. Set the following Skin->QVGA and Enter 100 MiB in SD Card size and click OK. This will add this as a AVD.
16) Now run the application.
17) This will bring up the AVD. This takes some time You should see the IBM bluelist showing up as one of the apps.
18) Click on IBM Bluelist. You can add grocery items. These items will persist even if you have to restart your application
19) The data is persisted in the IBM’s cloud. This can be checked by logging into BlueMix’es dashboard
20) Click the Mobile Data and the data entered in the AVD device will show up in Data Classes drop down.
21) The Analytics tab will give a graphical output of the API calls
So not the mobile app that is cloud enabled is ready.
Clearly the ability to build Android Apps with the data stored at a cloud opens up numerous possibilities for apps like Evernote, Pocket across several devices.
There you have your first Mobile Cloud App.
Watch this space!
Disclaimer: This article represents the author’s viewpoint only and doesn’t necessarily represent IBM’s positions, strategies or opinions


